Are you looking for a no-code way to automate document generation, auto-fill it with smart AI suggestions, and send it as an attached document via email? This guide walks you step-by-step on how to build such a system using n8n, Google Docs, AI Agents, and Email.
Let’s dive in!
🎯 Use Case Overview
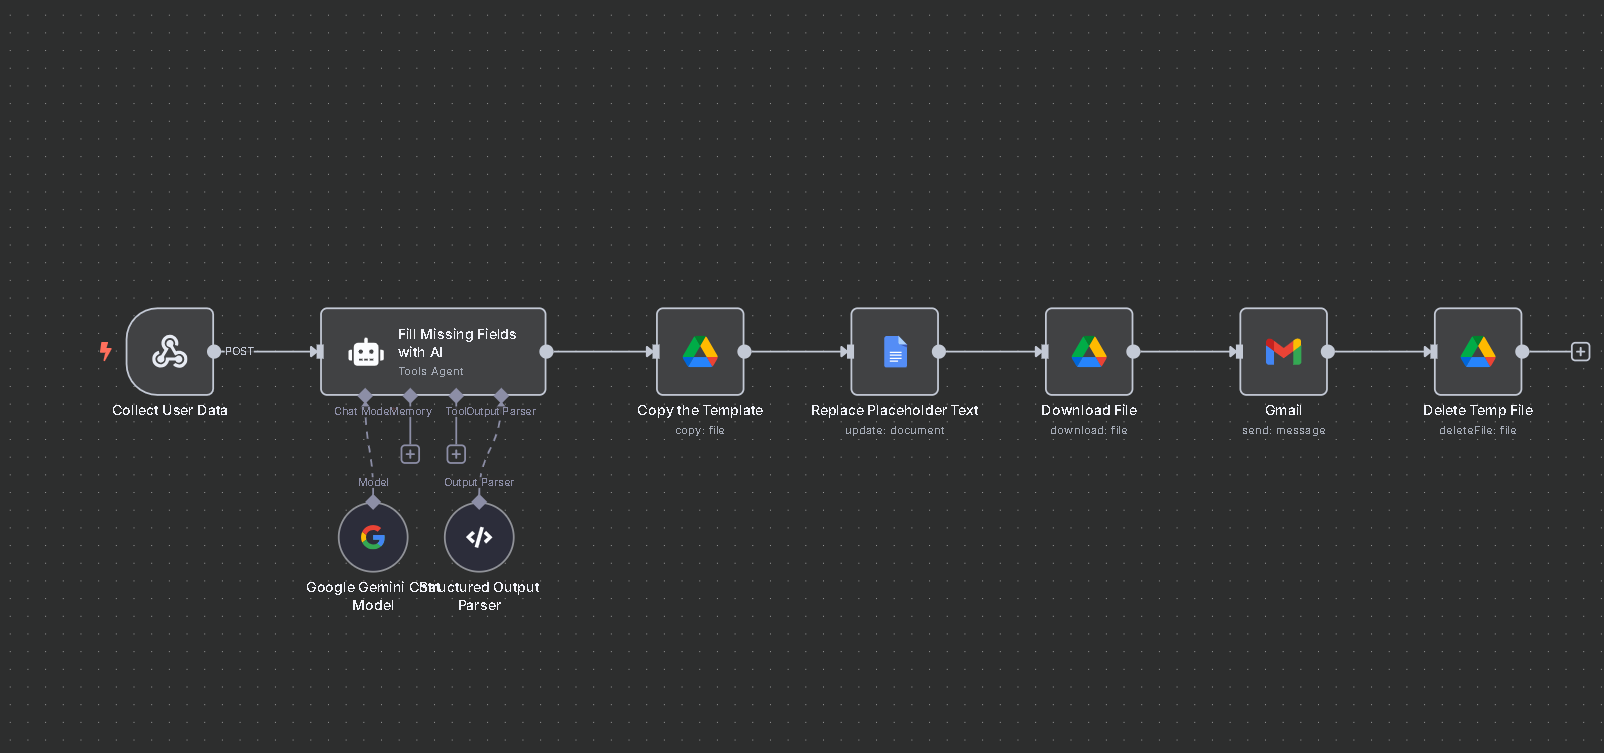
We want to build an automated n8n workflow that:
- Collects input from a user (e.g., name, purpose, email).
- Uses an AI Agent to fill in missing information.
- Copies a predefined Google Docs template.
- Replaces placeholders (like
{{name}},{{summary}}) with actual content. - Exports the result to a Document File.
- Sends it via email.
🧰 Prerequisites
Before we begin, make sure you have:
- An n8n instance running (self-hosted or cloud)
- Connected credentials for:
- ✅ Google Drive + Google Docs API
- ✅ Email (SMTP or Gmail)
- A Google Docs template with placeholders like:
{{name}}, {{email}}, {{purpose}}, {{summary}}, {{recommendation}}
🛠️ Step-by-Step Workflow Setup
🔹 Step 1: Webhook Trigger – Collect User Input
Use the Webhook node to start the workflow when a form or API call submits data.
Node: Webhook
- HTTP Method:
POST - Path:
generate-doc - Response:
When Last Node Finishes
Example data sent to this webhook:
[
   {
    "body":{
         "name": "Alice",
         "email": "alice@example.com",
         "purpose": "Team onboarding document"
    }
   }
]
📌 This is the only required input. We’ll let AI fill out the rest!
🔹 Step 2: AI Agent – Fill in Missing Fields
Use the AI Agent node to generate additional text, like a summary or recommendation, based on the user’s initial input.
Node: AI Agent
Prompt:
Based on this user input, fill in the missing fields like summary and recommendation.
User input:
Name: {{ $json.body.name }}
Email: {{ $json.body.email }}
Purpose: {{ $json.body.purpose }}
Require Specific Output Format : True
Add a Structured Output Parser Node to the Output Parser Connecter of the AI Agent Node.
Schema Type: Define below
Input Schema:
{
"type": "object",
       "properties": {
            "summary": {"type": "string" },
            "recommendation": {"type": "string"}
   }
}
It might return:
{
  "summary": "A report detailing the marketing performance Q1–Q2.",
  "recommendation": "Focus on social media campaigns for Q3."
}
🔹 Step 3: Google Drive – Copy the Template
Since the Google Docs node doesn’t support templates, we use Google Drive’s Copy operation to duplicate our Google Docs template.
Node: Google Drive
- Operation:
Copy - File ID: (Your template doc ID)
- New File Name:
Report - {{$json.name}}
✅ This step gives us a fresh doc that we can edit without touching the original template.
🔹 Step 4: Google Docs – Replace Placeholder Text
Now, update the copied Google Doc to replace placeholders ({{name}}, etc.) with actual values.
Node: Google Docs
- Operation:
Replace Text - Document ID:
{{$json.id}}(from the copied doc) - Replace fields (example) as 🙁
- Old Text :
{{name}} - New Text:
{{ $('Collect User Data').item.json.body.name }} - Old Text:
{{email}} - New Text:
: {{ $('Collect User Data').item.json.body.email }} - Old Text:
{{purpose}} - New Text:
: {{ $('Collect User Data').item.json.body.purpose}} - Old Text:
{{summary}} - New Text:
: {{ $('Fill Missing Fields with AI').item.json.output.summary }} - Old Text:
{{recommendation}} - New Text:
: {{ $('Fill Missing Fields with AI').item.json.output.recommendation}}
📄 Your Google Docs now holds a clean, filled report!
🔹 Step 5: Google Drive – Download File
Convert the newly filled document into a Document file.
Node: Google Drive
- Operation:
Download - File ID:
{{ $json.documentId }}(same as above) - Google File Conversion
- Google Docs: MS Word Document / Open Office Document / PDF / Other available Format (Select as per requirement)
- File Name: {{ $json.documentId }}.docx (or the required extension)
This outputs the document as binary data (data).
🔹 Step 6: Email – Send the Document
Attach and send the Document to the user via email.
Node: Email (SMTP or Gmail)
- To:
{{ $('Collect User Data').item.json.body.email }} - Subject:
Your AI-Powered Report - {{ $('Collect User Data').item.json.body.purpose }} - Email Type: HTML
- Body:
Hi {{$json.body.name}},<br/> Please find your generated report attached. Let us know if you need any changes.<br/> Best Wishes,<br/> Your Automation Team - Attachments:
- Binary Property:
data
- Binary Property:
✉️ Your user now receives the document automatically in their inbox!
🔹 Step 7: Google Drive – Delete Temp File (optional)
Delete the Temporary File
Node: Google Drive
- Operation:
Delete - File ID:
{{ $('Replace Placeholder Text').item.json.documentId }}(same as above)
📦 Download the Complete Workflow (JSON)
You can import this ready-made workflow into n8n directly.
Go to n8n → Import Workflow → Upload the file and customize the credentials and document ID.
🔚 Wrapping Up
With this setup:
- You automate form-to-document generation
- You let AI do the heavy lifting of filling in smart content
- You use Google Docs without needing advanced coding
This is just the beginning. You could easily extend this by:
- Saving reports to Google Drive or Notion
- Sending Slack/Telegram alerts
- Logging actions into Airtable or Sheets
🤖 ✅ How to Trigger Your n8n Workflow from Another AI Agent (e.g., OpenAI Function Call, LangChain, AutoGen)
🧩 What You Need
- Your workflow’s Webhook URL
- Method:
POST - Content-Type:
application/json - JSON payload matching the expected input
Example:
{
  "name": "Alice",
  "email": "alice@example.com",
  "purpose": "Team onboarding document"
}
🧠 1. Calling from OpenAI Function Calling (Tool Calling)
If you’re using an AI system like AI Agents on n8n, LangChain, or AutoGen, you can expose this n8n workflow as a callable function/tool.
Define the tool:
{
  "name": "generate_doc_report",
  "description": "Generates a filled-out document from a Google Docs template and emails it to the user.",
  "parameters": {
    "type": "object",
    "properties": {
      "name": { "type": "string", "description": "Name of the user" },
      "email": { "type": "string", "description": "Email to send the Document to" },
      "purpose": { "type": "string", "description": "Purpose of the document" }
    },
    "required": ["name", "email", "purpose"]
  }
}
Function logic:
import requests

def generate_doc_report(name, email, purpose):
    url = "https://your-n8n-url.com/webhook/generate-doc"
    payload = {
        "name": name,
        "email": email,
        "purpose": purpose
    }
    response = requests.post(url, json=payload)
    return response.json()
🛠 2. Tool Node Inside n8n
If you are managing multiple agents within n8n, you can call this workflow from another workflow using the HTTP Request node.
Node: HTTP Request
- Method:
POST - URL:
https://your-n8n-domain/webhook/generate-doc - Body Content Type:
JSON - JSON Body:
{
  "name": "={{$json.name}}",
  "email": "={{$json.email}}",
  "purpose": "={{$json.purpose}}"
}
This lets your agents communicate between n8n workflows using tool-chaining logic.
🔐 Important Security Note
- You can add authentication (like API keys or header tokens) to your webhook for protection.
- Alternatively, keep your n8n instance internal behind a reverse proxy or VPN if sensitive.
🚀 Example Use Cases
| Agent System | Use Case |
|---|---|
| OpenAI Agents | Ask GPT: “Generate a report for John and email it.” |
| LangChain | Chain agents: One collects info, one calls the tool to trigger n8n |
| AutoGen | Agent team fills fields and calls n8n to complete the document |
| Internal n8n workflows | Tool Node triggers another automation pipeline via webhook |
🔒 How to Secure n8n Webhooks for External AI Agent Use
Securing your n8n webhook is critical when exposing it to external AI agents or systems. Below are the best practices for protecting your webhook from unauthorized or malicious use.
Most agent systems (OpenAI, LangChain, custom Python clients) support setting HTTP headers.
🔐 Step 1: Expect a Secret Header in Webhook
In your n8n Webhook node, you can add a check using a Set + IF node:
- Add a Set node right after the Webhook:
- Access
{{$headers}}to read incoming headers. - Set a field:
authHeader = {{$json.headers['x-api-key']}}
- Access
- Add an IF node:
- Check:
authHeader equals my-secret-token - Continue only if matched.
- Route invalid requests to an error handler.
- Check:
✅ Example Header Required:
x-api-key: my-secret-token🧠 AI Agent Setup (Python Example):
import requests

headers = {
    "Content-Type": "application/json",
    "x-api-key": "my-secret-token"
}

payload = {
    "name": "Alice",
    "email": "alice@example.com",
    "purpose": "Monthly briefing"
}

res = requests.post("https://your-n8n-domain/webhook/generate-doc", json=payload, headers=headers)
✅ Option 2: Webhook Auth (Basic or Header Auth) – Built-In
In the Webhook node:
- Set Authentication to:
Header Auth: Require a token in a specific header.Basic Auth: Require username/password.
Example for Header Auth:
- Header name:
x-auth-token - Expected value:
ai-super-secret
🔐 n8n will auto-reject requests without this.
✅ Option 3: Use a Secret Token in Payload
If headers aren’t supported, include a secret field in the body and validate it.
- Webhook receives JSON:
{ "name": "Alice", "email": "alice@example.com", "purpose": "Briefing", "token": "my-safe-passphrase" } - Use an IF node:
- Condition:
token equals my-safe-passphrase
- Condition:
✅ Option 4: Reverse Proxy + Firewall Rules
If your n8n is self-hosted, add a security layer via:
- 🔐 Nginx or Cloudflare: Restrict access by IP or hostname (only allow your AI system’s server IP).
- 🔐 VPN Tunnel: Only accept requests from within a secure network.
🚨 Bonus: Add Logging
Use a Set → Append → Google Sheet/Notion to log:
- Who triggered it
- When
- From which IP or user-agent (use
$headers['user-agent'])
Contact us for getting help in your AI-Powered Workflow or AI Agents.